Since Verke moved into a new office space we didn’t have a doorbell at all. Although going to the local electronics store would have been easier, I opted to utilise the Raspberry Pi -computer bought for trying out projects. How did it turn out in absence of prior experience?
The concept itself was simple: I wanted the Raspberry Pi (a single board computer based on Linux architecture, RPi for short) to react in a certain way once the doorbell button is pushed. At minimum, a doorbell needs to of course emit a sound, but I also wanted to try and make the doorbell talk in our internal Telegram-conversation. I bought all the parts from our local electronics store, barring the RPi itself that had already been previously purchased.
At this point it must be stated, that the writer of this post has no prior experience of these kind of projects but this was rather much about learning-by-doing and trial-and-error. During this process I might have done something in an unnecessarily complicated way or even erroneously; we take no responsibility for any damage to Raspberry Pi’s, doorbells, nerves or work community dynamics. This was to me, however, a fun and immersive way to learn physical computing in the spirit of the maker movement!
What is needed for this project?
- Raspberry Pi computer (I used a Pi 3 model B)
- RPi –case (optional)
- Button (any simple two-contact button will do nicely)
- Some conducting wire
- Wrapping to insulate the wires (alternatively a pre-insulated two-conductor lead)
- Connectors
- Speakers (any speakers or speaker with a 3,5mm connector)
- Tools to strip the insulation from the connector wires (scissors or other utensils will do, but requires more finesse)
- Pliers to crimp the connectors to the wires
- Screwdriver to install the doorbell
- HDMI-lead, usb-mouse and a keyboard (not required after installation)
Defining the concept
Figuring out any new solution should be started by thinking about what the end-user wants. What needs to happen when the user presses the doorbell’s button? There is quite a high probability that they want the door to be opened.
Before the door is opened, however, a few things need to happen first. Like previously mentioned, some kind of audible signal is the de facto standard of doorbells. This means that the RPi needs to play a sound. My goal was also to make the doorbell send a message to our Telegram channel in one way or another; luckily Telegram has a very easy interface to create Bots (or automated chat programs). We also obviously need a physical connection from the button to the RPi, ie. a couple of connecting wires. Before anything happens, though, the RPi needs to be instructed via programming to follow the logic “when the button is pressed, play this sound and send a message to Telegram.”
The logical chain then forms as Button -> RPi -> Code -> Speakers + telegram bot.
Preparing the Raspberry Pi
Install the memory card containing the operating system included with the RPi according to the included instructions. Use an HDMI cable to connect your RPi to your screen and add a USB keyboard and mouse. Finally, connect the power adapter and the RPi will automatically boot to a graphic user interface/desktop. If you are not familiar with Linux -based operating systems, the RaspBian OS that comes with the RPi might feel a little odd at first. The menu on the upper left contains pretty much the same options as most operating systems do. If you are not using a wired connection, use the menu to connect to your WLAN.
Many tasks in Linux operating systems are best handled via a command prompt called terminal. Some tasks can’t even be done via the graphic user interface. Most likely the operating system needs an upgrade, so you can practise using the terminal by updating your OS. The terminal is used by writing commands and running them by pressing the enter key. Open up Terminal and write the following commands:
sudo apt-get update

sudo apt-get dist-upgrade
The first command above updates the list of packages (programs) available and the second one updates all the packages that are available. The structure is as follows:
- sudo is an abbreviation of “superuser” and “do”. This means that the following command will be run with administrator rights. If the RasPi asks for a password, the default credentials are pi / raspberry.
- apt-get is the program that is used in Linux to get packages, libraries and programs from online repositories
- update and dist-upgrade are parameters given to a program to be run (apt-get being the program in previous examples). You can often find available parameters by using the parameter –help, as in apt get –help .
The update will take a while, so wait patiently or prepare the button with the connecting leads while you wait. Once the update is complete, you might want to install python-telegram-bot that is needed to get the doorbell talking to Telegram.
sudo pip install python-telegram-bot –upgrade
Connecting the button with Raspberry Pi
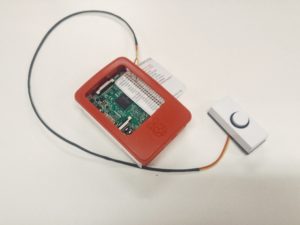
Although you could basically use a doorbell by just joining two exposed wires, I obviously wanted to install a button outside our door. In the button that was readily available there are two metal contacts that are closed by pressing the button. Install the connecting leads (preferrably short, 20-30cm ones) into the button by opening up the screws in the button and installing the stripped wire ends under the screws. Install the connectors into the other ends of the wires; with our selected RPi case there wasn’t room for the plastic housings of the connectors, so I only used the inner metal pins by crimping them onto the leads.
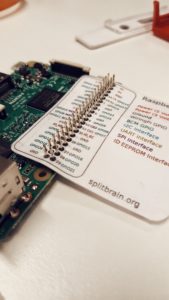
In Raspberry Pi all physical devices are generally connected to the GPIO interface (“General purpose in/out”, pictured left). Every pin (the golden poles) on the interface has its own designation and purpose. To make things easier you might want to print out a diagram online, so you know which pins to use and avoid damaging your RPi. I used this one. Whenever you are working with the connections, disconnect the power source to avoid any short-circuits. (Obviously don’t do this while your RPi is updating, though!)
I decided to interface the doorbell with the pin GPIO18. The other lead from the doorbell goes to a grounded pin (labeled GND). In a connection as simple as this one it makes no difference which lead you need to use; in a more complicated one it would matter a lot more. In practice, when the button is pressed, it connects the pins GPIO18 and GND together. The code we will write in the next section defines what happens then. It is advisable to write down what pins you are using to avoid any confusion while coding.
It is important to note, that some of the pins output 3 or 5 volts of power by default. You want to be pretty certain of the pins you are using to avoid any damage to either the RPi or pacemakers of people coming in contact with your device. Some tutorials recommend building in a separate protection circuit to avoid this, but this is one of the times I personally decided to cut corners. Your mileage may vary.
Programming the doorbell
To make the RPi react to the user pressing the button, we need some clever programming. The easiest way to start programming your RPi is with a programming language called Python. The developer tools of Python included in the RPi OS are well suited to the task. Open the editor from the upper menu of the desktop (Programming -> Python 3 (IDLE). Open up a new file (file -> new) and you can write new code. It is recommended to immediately save the file, you can for example call it “buttontest.py”.
First you want to start by a few very simple lines of code so you can test whether the physical connection to the button is working. This can be done with the following code (which is explained below):
# Import the required libraries

import RPi.GPIO as GPIO

from time import sleep
# Define GPIO -pins as standard

GPIO.setmode(GPIO.BCM)
# Define pin 18 as input and enable internal resistors

GPIO.setup(18, GPIO.IN, pull_up_down=GPIO.PUD_UP)
# function for button press

while True:

input_state = GPIO.input(18)

if input_state == False:

print ("The button works!")
# 0.1 second break to conserve processor resources

sleep(0.1)
All the lines starting with # are comments. With comments a line of code is ignored when running the code, and it can (and should) be used to explain what each segment of code does. The following is happening in the code above:
First we define libraries to be imported. Libraries are collections of pre-written code that can be used to avoid having to code all of the commonly used functions for each program separately. Here we have imported the library controlling the GPIO interface (and given it the “nickname” GPIO to make coding easier). We have also imported the function “sleep” from the library “time”. The GPIO interface must be defined so the program understands what sort of devices we are connecting. Here we have defined it as “standard” since we don’t need anything exotic and we want it to match our printout of the connections. The next line defines that we will be connecting the doorbell to the pin 18, ie. the RPi will check this pin for an incoming signal. An internal resistor needs to be enabled because the signal is read according to the strength of the signal between pins 18 and ground; the resistor is meant to make the signal more clear. Basically, because the circuit is so simple, the value would fluctuate continuously between 0 and 1, and the doorbell would constantly ring on its own. This resistor could also be replaced by a physical resistor installed on the connecting leads, but this seemed unnecessary.
This code uses a very simple while -loop. The code deconstructs as follows:
- While running this code..
- read incoming signal from pin 18 and
- if the signal reads as “false” (when the button is pressed)
- print message “The button works!”
The last line of code (the “Sleep” -function) is added to conserve resources. Although this code is very light, I was at first confused as to why 100% of processor resources were being used and the RPi was considerably bogged down. Through some research and pondering I realised that the code was being run as many times in a second as the resources would allow because there was no break. By adding a 0.1-second break into the loop we force the code to run “only” about 10 times each second.
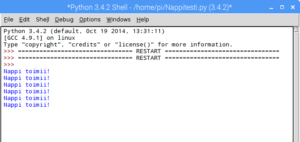
If everything went according to plan, when you run the code (select “run” in the editor or input the command python buttontest.py in terminal) there should be a message “The button works!” when pressing the button. If using terminal, you must press ctrl+c simultaneously to interrupt the program.
Programming the Telegram bot
In our project we wanted to get the doorbell messaging us online. While our chosen channel was Telegram (via a bot you must first create inside Telegram) there are loads of other options as well. The doorbell could for example tweet, send email or, for instance, take a picture with a web -camera. The skill level required obviously varies, but by applying and trying out stuff you can do pretty much anything.
Before we get to programming the proper doorbell, we need to take care of a couple of things. The sound library pygame is already pre-installed, so we don’t need to worry about it. For Telegram, however, we need to create the bot and find the id for the conversation we want the doorbell to talk in.
The bot is created directly in Telegram. Open up a conversation with the bot @botfather and create a new bot according to these instructions. Write or copy/paste down the authorisation token (e.g. 110201543:AAHdqTcvCH1vGWJxfSeofSAs0K5PALDsaw), you will need it in the next step. Invite your new bot to the Telegram channel you want the doorbell to talk in. Chat a few lines with your bot (anything will do, he won’t reply yet) and go to the web address https://api.telegram.org/bot<token goes here>/getUpdates and find the field “chat”:{“id”:XXXXXXXXX,”title”:”CONVERSATION NAME”. Write down the id of the conversation.
Programming the doorbell
Now we are ready to start programming the doorbell. Find an audio sample you want to use in your doorbell and download it to the RPi. Then write the following code in a new file called doorbell.py:
# -*- coding: utf-8 -*-

# Input-output and time function for delay, audio library and system commands

import RPi.GPIO as GPIO

from time import sleep

from os import system

from pygame import mixer

import logging
# import libraries for telegram and define bot

import telegram

bot = telegram.Bot(token='XXXXXXXXX-YOUR-TOKEN-GOES-HERE')
# Define GPIO-pins as standard

GPIO.setmode(GPIO.BCM)
# Define pin 18 as input and enable internal resistors

GPIO.setup(18, GPIO.IN, pull_up_down=GPIO.PUD_UP)
# function for button press with try/finally -loop
try:

while True:

input_state = GPIO.input(18)

if input_state == False:

bot.sendMessage(chat_id=-YOUR_CHAT_ID,

text="Someone is at the door!")
mixer.init()

mixer.music.load("Sounds/YOUR_DOORBELL_SOUND.wav")

mixer.music.play()

while mixer.music.get_busy() == True:

continue
sleep(1.0)
# 0.1 second break to conserve resources

sleep(0.1)
finally:

# Reset state of button and send message if the program has an error bot.sendMessage(chat_id=-YOUR_CHAT_ID,

text="The doorbell is offline!")

GPIO.cleanup()
A few notes of the code above: There are more libraries imported than in the first example. The library “mixer” (a part of the library “pygame”) is needed to play sounds. System, logging and telegram -libraries are needed for the Telegram -bot to work. If the python-telegram-bot -program has not been installed, the code will halt when trying to run the telegram part of the code.
The line starting with “bot = telegram.Bot” defines the bot that is used. For this line you need the token you obtained in the previous step. Copy your token into the code, but take care that the single quotes (‘) stay in place!
I have exchanged the previous while -loop for a try-while loop. This is because I wanted the bot to be able to signal us if the doorbell has an error. The part of the code after finally: is only run when the loop is interrupted.
The first part of the code is familiar in it’s purpose: “while this code is run, if the button is pressed do this.” The text from the previous example has been replaced with telling the Telegram-Bot to send a message “Someone is at the door!” into the selected conversation. You must of course input your own value to the Chat_id field so the bot knows where to post the message. The text itself can naturally be whatever you wish it to be; if you were to, for example, connect a sensor on the door to your summer cabin, the text could be one notifying you of possible burglars.
In the second paragraph of code we play a sound through the speakers connected to the RPi. The first line enables the mixer program, the second one loads the sample into memory, the third plays the sound and the fourth prevents the mixer from restarting if the sound plays again.
The final line, sleep(1.0), adds a one-second delay into the code. This time we don’t only want to conserve resources but this serves a double purpose: we also want to disable double-presses of the doorbell. Because this kind of switch is a simple mechanical one, there are almost always partial connections; when the button is pressed and the contacts are momentarily “almost closed”, there can be multiple doorbell sounds at once. You can, of course, add an even more significant delay – let’s say 15 seconds – to prevent impatient visitors ringing the doorbell multiple times and disturbing the feng shui of your office space.
The final addition tries to achieve some error-proofing by adding the option of the RPi telling you when there is an error. As such the code works, although with limitations; while the bot does tell us when the code stops running, it cannot take into account a situation where the RPi loses either internet connectivity or power. The latter could maybe be implemented via playing a sound when the doorbell loses internet connectivity.
Final touches

When everything is installed in their final positions (longer cables insulated and installed, button installed outside the door, proper location for the RPi etc.) you might want to install a case on your RPi. Take care in routing the cables outside the case so they don’t get squeezed and damaged. Because it is hard to move the RPi when the connecting leads are installed, I have thought about routing the connectors outside the case to make the connectors easier to remove when needed.
To make the RPi more resistant to random reboots or intermediate loss of power, you might want to make the previously created code run when the RPi boots up. You can do this by applying the following instructions:
Use Terminal to create a new file called doorbell.desktop in the folder /home/pi/.config/autostart/ .
cd /home/pi/.config/autostart/nano doorbell.desktop
Write the following lines into the file in the nano editor that opens:
[Desktop Entry]
Encoding=UTF-8
Type=Application
Name=Doorbell
Comment=This automatically runs the doorbell code on reboot
Exec=  python /home/pi/doorbell.py
StartupNotify=false
Terminal=true
Hidden=false
Save the file by pressing ctrl+x (exit) and answering yes to the question whether to save the file. Now the program should be automatically run whenever you reboot your RPi.
There is one serious flaw in the current code: the doorbell has zero tolerance on the loss of network connectivity. It is understandable that telegram messages are not sent when there is no network connection; however, for some reason the sounds aren’t played either. Supposedly there should be some form of failsafe in the code, something like “Try to post to Telegram for 10 seconds, then return to beginning”.
What did I get out of this project?
Obviously I was left with a mixed bag of components, connectors and leads, but luckily something else as well. First of all, this project illustrated for myself very clearly the fact how there needs to be time to try out these kinds of projects when implementing digital youth work methods. Secondly this project has inspired me to take a deeper interest in Maker culture and methods; it’s so inspiring to be presented with a Raspberry Pi with only the instruction to “Make something cool!” and then think on the need, concept, physical build and programming. I also most likely learned lots about electronics and programming and this kind of project could be great to implement with young people as well.
Highly recommended!
-Juha-